How to Win at Dominoes : Scoring, Defense and Reading the Board
![]() American Dominoes, sometimes called All-Fives or Muggins Dominoes, is the mega-popular version of the classic game that has many thousands of players connecting their tiles, often referred to as "Bones", to the Dominoes board in online game rooms across the interweb. The nature of the game produces explosive scoring and fast-paced decisive games, which allows players to enjoy multiple games in succession without losing its appeal.
American Dominoes, sometimes called All-Fives or Muggins Dominoes, is the mega-popular version of the classic game that has many thousands of players connecting their tiles, often referred to as "Bones", to the Dominoes board in online game rooms across the interweb. The nature of the game produces explosive scoring and fast-paced decisive games, which allows players to enjoy multiple games in succession without losing its appeal.
However, while the game of Dominoes has been enjoyed for years, the majority of casual Dominoes players have long held that the game is, for the large part, simply one of chance. Content to base their hopes of winning on a favorable distribution of the tiles, they simply wait to make their automatic plays and move on to the next round. Chess and Poker Dot Com has decided to demonstrate that the game of Dominoes is in fact rich with subtle strategy ideas and powerful positional maneuvering by developing the Dominoes strategy guide, which works to streamline play and sharpen the necessary scoring abilities into more effective play. The guide assumes that you are familiar with the general rules and have played several games of Dominoes previously.
Basic Scoring and The Spinner in American Dominoes
A standard first round of play begins with the player holding the highest Double being required to play it immediately to the board. The first Double played to the board in any round is known as the Spinner. The Spinner is unique from all subsequent Doubles played in that future Dominoes can branch off from any arm of the spinner during the round. It is typically played vertically to the board, as are all Doubles, to distinguish itself from the standard non-double tiles. Players then continue on by connecting Dominoes from their hand to the board Dominoes until the round ends when one player completely exhausts their supply of Dominoes by playing out all their tiles, the board becomes locked with no available legal plays or someone wins the game based on achieving the agreed upon number of points, typically 100pts per game. If neither player has compiled a game-winning number of points when a round ends, play continues on to the next round until a winner is arrived at.
Players score points whenever they play a tile to the board so that the Board Count would then equal any multiple of five. The Board Count (BC) is the sum total of all available open ends on the board. So whenever a player changes the Board count to 5, 10, 15, 20, 25, 30 or 35 by playing a tile to the board, they then score that number of points. However, should a play not result in a multiple-of-five Board Count, the player does not score any points and the turn passes to the opponent. Players may also score points by playing out all of their own tiles before their opponent. Whenever this happens, the round is considered over and the player who still has tiles left must count up all of the Pips (spots) in their remaining tiles. The player who played out all their tiles then receives that exact number of points and the next round begins. For example, should a player play out all their tiles and the opponent has the 6-6 and 0-2 tiles left in their hand, they would score +14pts (6+6+0+2) and the round would be over. Should the board become locked, with no available plays from either player, both players must then count up the Pips of all the tiles in their hand with their opponent scoring that exact number of points.
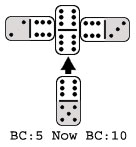
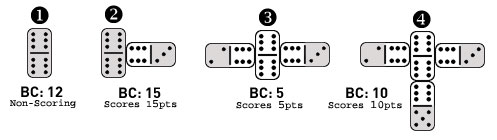 Let's examine the first four moves of an American Dominoes game by following the chart to the right. The first move has the Double-Six Domino being played to the board, which makes it the Spinner. As we recall, the Spinner can now be built upon from all ends on the following plays. Note that below the Double-Six is the caption "BC:12 Non-Scoring". This is because the total number of Pips on the Double-Six add up to twelve, and no other Dominoes have been connected to the board yet. If the Spinner would have been a Double-Two, for example, the initial board count would have been Four, since 2+2=4 of course. The second move has Player 2 connecting the 3-6 Domino to the Double-Six, resulting in a new Board count of 15. This is because now both the Double-Six and the three are open scoring ends on the board (highlighted in gray). Since the BC is a multiple of five (12+3=15), the second player immediately scores 15pts.
On the third move, the first player again takes a look at the board and decides to Hook, another term for connect, the 2-6 tile to the opposite side of the Spinner. This results in a new board count of 5 (2+3=5), with the open scoring ends in play again shaded in gray. This is because that once the first player connected their tile as the second arm of the spinner, it was effectively "buried" and taken out of play as far as scoring concerns. Make sure that you understand this important scoring rule, as it has often been described innaccurately in other rules explanations as still being in play. In American Dominoes, once the second arm has been attached to the spinner it no longer plays a part in scoring. However, the two additional arms can still be played to, but the Spinner is officially dead in scoring considerations after the second arm, including the remaining two playable arms (the North and South branching arms). In fact, on the fourth move above we find the second player hooking the 5-6 onto one of still available arms of the spinner, resulting in a new BC of 10 which scores the player 10pts. The score after these four moves would be 25-5 for the second player and the round with the round continuing to completion.
Dominoes Scoring : Advanced Methods
To effectively win at Dominoes, players must determine whether or not the tile they have choosen will result in a scoring Board count once played. In most online rooms, the current Board count is often displayed as a helpful reminder to both of the players. In general, players usually select a tile in their thoughts and then add up all of the board ends, including the end they intend to leave open, concluding that once added up the resulting Board count will either score or be a miss. Some players will even pick up the tile and hold it over the available hook end without actually dropping it into play, making the manual addition of all the open ends visually a bit easier to complete. This slow way of playing is both time-consuming and entirely unneccessary! It's now time to learn a much more effective method of determining how each tile in your hand affects the current Board Count by using the ChessandPoker.com Dominoes strategy chart.
Hooking Standard, Non-Double Tiles
 Each non-double Domino has two unmatched ends, with one end always being bigger (having more Pips) than the other. For example, on the 3-6 tile the big end would be the Six and the smaller end the Three. All of these standard, non-double tiles therefore must have a difference in Pips. The Difference for any tile of this type is arrived at by subtracting the smaller end from the bigger end. In our example, the difference for the 3-6 tile is three, since six minus three would equal 3. The 4-5 tile would have a difference of 1 (5 minus 4=1), the 2-4 tile has a difference of 2 (4 minus 2=2) and so on. This simple method of determining the difference for each non-double tile is the foundation for a greatly enhanced understanding of available scoring plays.
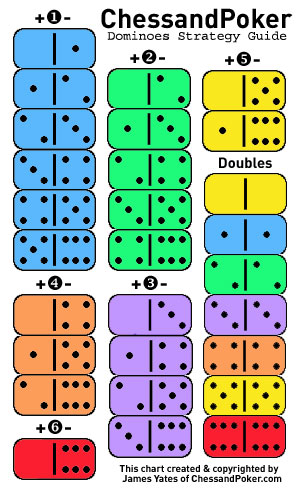
Whenever a non-double tile is connected to the Board, with only a few exceptions (explained below), it changes the Board Count in predictable ways. Hooking the small end of a tile Adds the difference to the current Board Count, and hooking the bigger end Subtracts it. Using the Dominoes scoring chart we've developed to the right as a referrence, we find the non-double tiles arranged so that tiles with identical differences are grouped together, along with the Double tiles off to the side (which we'll examine later). For example, there are six tiles that have differences of 1 (the 0-1, 1-2, 2-3, 3-4, 4-5 and 5-6 tiles) and they are highlighted in light blue on the chart under the heading +/- 1. This is because a player may hook the big or small end and change the current Board count by that difference, subtracting from or adding to it depending on which end they were able to hook into the board.
Consider the scenario where the available open scoring ends of the board result in a Board Count of 7. To score on this board total, we must either add +3 to the current Board Count, which would result in 10pts (7+3=10) or -2 for 5pts (subtracting 2 from 7). Using the chart, we see that hooking the small end of any tile grouped under the +/- 3 section, highlighted in purple, would add +3 and score 10pts. Additionally, by hooking the big end of any tile grouped under the +/- 2 section, highlighted in green, we would subtract -2 and also score by reducing the BC to 5pts.
Hooking Double Tiles to the Board
 The Doubles are also listed on the chart, catagorized together on the far right. Like the groupings of non-double tiles, they are also colored to help further classify their adjusting properties. The rules for hooking a Double onto the board are similiar to, but slightly different from, the methods for non-doubles. Since Doubles do not have an end that is larger than the other, there is no difference for Double tiles. Instead, when we hook a Double onto the board you simply Add the denomination of the Double. In fact, Doubles always Add to the Board count and never subtract from it. So if you were to hook the Double-Three to the Board, you'd add +3 to the Board Count. For the Double-Five +5 is added, and so on. We've colored the Doubles similiar to their non-double partners, such as making the Double-One blue since it will be adding +1 when it's connected, to make it easier to understand. However, remember that Doubles can only add to the BC and cannot reduce it, unlike the more flexible non-doubles.
Hooking Standard Tiles Onto Board Doubles
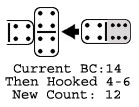 So far we've covered how to connect the tiles in your hand, both standard and Doubles, onto regular (non-double) ends. But what about when there's a Double on the board to hook into? In these situations, slightly different rules are required. To calculate the effect of the tile you hook into, you must take the sum of the Double (the total number of Pips found on it) and subtract it from the end you're going to leave. For example, say you are going to hook the 4-6 onto the Double-Four. You'd take the sum of the Double-Four's Pips (8) and subtract it from the Leave (6) to arrive at the Board changing total of -2 (6-8= -2). Considering a current Board Count of 14, adding the 4-6 onto the Double-Four results in a new Board Count of 12 (6-8= -2 then -2+14=12). Adding standard tiles to Doubles often results in board reductions, due to the fact that you're covering a large tile and leaving a smaller end, and can even achieve larger than usual negative reductions to the board such as -7 and lower.
Spinner Scoring Exceptions
 Concerning the Spinner, there are certain exceptions as to how connecting tiles affect the Board Count. When starting the first, third and fourth arm off of the spinner, you simply add the Leave end instead of adjusting the count in the usual manner. For the first arm, as in move four in the original example at the beginning of this article, the Spinner won't be covered (only added to) and therefore won't be taken out of play. There we simply added the Leave end (3) to the existing Double total (12) to arrive at the scoring total of 15. This also holds true for the third and fourth arm from the spinner. The second arm is always going to bury the spinner by connecting opposite to the first arm. However, both third or fourth arms are connecting to the Spinner after it's already dead as far as scoring is concerned. In those two cases, you again would just add the Leave end. Any plays to these arms after the first tile has been added to start them are subject to the standard board adjustments until the end of the round.
Simplified Dominoes Board Counts
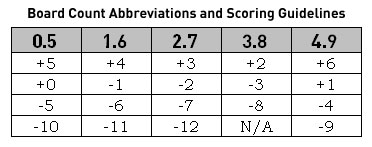 While examining your hand for scoring tiles, it can often help to condense the Board Counts into further simplified catagories to ease the amount of calculations needed. In the chart to the right, we see the headings 0.5, 1.6, 2.7, 3.8 and 4.9 above differing positive and negative numbers. The headings describe Board count Partners, counts that need the same tiles to score. They are identified by using only the rightmost digit of each available Board count, disregarding the first digit. The heading 0.5 applies to any board count ending in zero or five, such as 10, 15, 20 for example. The heading 1.6 would therefore identify counts ending in one or six as with 6, 11, 16, 21 and so on. It's possible to group these differing number of board counts together for the simple fact that they all require the exact same tiles in order to score.
Let's use the 3.8 heading to better illustrate this concept. All counts ending with either a three or eight (3, 8, 13, 18 etc) need +2, -3 or -8 board adjustments in order to score. The only situation in which this does not hold true, as far as scoring is concerned, would be with negative numbers and low Board counts, since reducing them would arrive at zero! Try it for yourself. To score points, any Board Count ending in three or eight needs the same tiles. This holds true for all of the other groupings as well. So if you have a board count of 14, which catagory would you look under for a listing of its scoring adjustments? The 4.9, of course, because any board count ending in four or nine (4, 9, 14, 19 etc) all need +6, +1, -4 or -9 board adjustments to score.
Domino Strategy Guide
While the information above may seem a bit much to absorb at first, rest assured that once you've grasped the simple idea of differences in the tiles you'll soon be able to add and subtract from the board in your head in no time at all. This will greatly increase your feel for the game and avoid costly missed scoring opportunities. You'll be able to take a quick look at the board and your tile stack, instantly noting which tiles score or miss. Now it's time to have look at some of the advanced Domino strategy ideas that you'll want to utilize in your games to increase your winning advantage and understanding of American Dominoes.
Maintaining a Managable (Low) Board Count : Defense
Dominoes is a very high scoring game. On each play there are almost always scoring possibilities to be found, with players scoring and relieving tiles from their hand in rapid fashion. For this reason, the Board Count becomes important especially for the player trailing in points. With higher BCs come the risk of higher point totals scored. For example, say it's your turn to play and the Board count is 12. You have the option to play either the 1-2 tile and make the BC 13, or you can reduce the board count to 7 by hooking the big end of the 1-6 tile. You are behind 85-70 in the game. Which do you choose? Reducing the Board count caps the total points possible for your opponents next play at 10pts. Should you choose the first option (making the BC 13) the highest points play increases to 15pts with any +2 tile by the opponent. Driving down the Board Count in a defensive attempt to limit the opponents scoring threats and hopefully retake the initiative is a recurring theme throughout each round in a Dominos game.
The Importance of the Initiative : Offense
 In Dominos maintaining the initiative is a key concept in winning the game. You keep the initiative, of course, by scoring points. When you score there are very few tiles that your opponent can have that will allow them to rescore immediately. This means that more often than not, they'll be forced to play a miss and allow you another shot at scoring on your next play. In fact, only the 0-0, 0-5, 1-6 and 5-5 can score immediately following a scoring play by your opponent when connected to standard ends. These tiles either maintain the current board count (+0 for 0-0) or increase/decrease the scoring total by five (+/- 5 for 0-5, 1-6 and 5-5), all of which score points and force the opponent to likely play a miss on their next turn. These are powerful tiles that can be used to keep the initiative and give you more chances to score.
Thinking along these lines, we realize that if there are available ends to hook this initiative-retaining Dominoes to, perhaps it can be favorable to drive the board count as highly as possible. Should the opponent score after we've raised the Board count by adding heavy tiles (doubles or tiles with high Pip totals like 5-6), we can simply re-score with our great tiles and hopefully force them to miss on the next turn giving us yet another opportunity to score. Interestingly enough, this concept can be extended to Doubles to add further depth to the play.
Inducing with Doubles then Countering : Offense
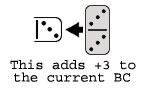
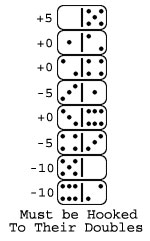 For every Double played to the board, there is at least one standard tile that can be hooked into it that either maintains the current Board Count or increases/decreases it by multiples of five. Knowing what these tiles are can help to determine when you can drive up the Board count, allow your opponent to score and then rescore on them, taking back the initiative. The chart on the left shows these tiles, which must be hooked onto their corresponding Doubles already on the board, to rescore immediatly. The results of hooking each tile into their board doubles is shown in the margins for referrence. Remember that they must be hooked into the appropriate double on the board in order to change the BC in multiples of five. If they are attached to standard ends, they will change the board in the usual manner based on the difference of the tile and not the results shown in the chart.
Our chart is meant to be used in conjunction with your strategic play throughout a round. For example, should you hold both the 1-1 and 1-2 tiles, you may choose to avoid playing the 1-1 to the board (unless forced) until late in the round. This allows several other "1" tiles to come into play and increases the chance that your opponent won't be able to bury (hook to) the Double-One when you play it. You could drive up the board count, play the 1-1 tile to the board and hope for your opponent to score. If they do, you counter by hooking the 1-2 into the Double-One (+0). If they don't immediately score, and don't play to the Double-One, you can drive the Board count even higher and then make your neutralizing play.
Blocking the Board : Defense
A player "Blocks" the board when they play a tile so that most or all the available hook ends on the board are the same. So if there are two arms off the spinner and both of their ends are the same, the board has become blocked. The second and third arm of the Spinner, of course, are usually available options, but in many cases making the arms of the board match results in forcing your opponent to draw more tiles since they cannot make a play. You may also block the board by making leaving ends that are known to be unfavorable for the opponent. If you noticed your opponent hadn't made a play to any Three hook ends during the round, you may conclude that blocking the board by making it all Three ends could force them to draw if they indeed had a deficiency of tiles having Threes on them in their hand. Making a mental note of potential problem ends for your opponents is a great technique as this information may indeed prove very useful at certain stages of the game.
One item to remember as far as Blocking is concerned is that while you are forcing your opponent to draw more tiles from the boneyard, this seemingly increased advantage (if you can play out your tiles you score for all those extras they just drew) can in fact present some steep dangers to your winning chances. With more tiles comes an increased scoring flexibility. Now when you don't score, and sometimes even when you do, it seems the opponent will hold the tiles needed to punish you immediately. It's certainly a case of "Be careful what you ask for, you just might get it" since it was you that forced them to draw all those great tiles! In this situation, controlling the board count (as described above) must be at the top of your list, keeping it as low as possible to limit the level of scoring against yourself and giving you the opportunity to score by playing out all of your own tiles.
The One Over/Under Counts : Offense
The Board Count groupings of 1.6 and 4.9 are known as the "One Over/Unders". This is because these counts are either one digit over or under a scoring multiple of five total. Counts such as 11, 14, 16 and 19 just miss scoring points in American Dominoes. Using the scoring chart above, however, we notice that these counts also benefit from certain groups of additional tiles. The 1.6 group can score with +4, -1, -6 and -11 board adjustments. The 4.9 group scores with +6, -1, -4 and -9 board adjustments. As we can see, excepting the large negative adjustments from hooking into board doubles, both groups share identical interests: the +/- 1,4,6 groupings of tiles. As a whole, this means that there are potentially 13 tiles (the blue, orange and red tiles) that can adjust these board counts into scoring results. In fact, the 4.9 grouping seems to be very potent with the additional benefit of receiving the +6 tiles, which is the highest scoring adjustment available in the game.
The Middle Counts : Defense
The board count groupings of 2.7 and 3.8 also are noted as sharing mutually beneficial groupings of tiles: the +/- 2 and 3 groups. In contrast, this group contains only 11 tiles (green and purple) that can potentially adjust them into scoring counts. Based on this information, we can theorize that in general the Middle Counts may be the best defensive counts to adjust the board to, when possible, and the One Over/Unders may likely offer more offensive results than the Middles. Take note of your Domino games when there are 1.6 or 4.9 counts on the board, particularly the 4.9's. These counts are highly prone to scoring and in many cases avoidance of these counts when trailing in the scorebox may be the difference in winning or losing a close game.
ChessandPoker.com Browsing Options
Thank you for reading this featured game article! Please select one of the links below to continue navigating the Chess and Poker Dot Com website. Let us know if we can be of any further help. Good luck and happy gaming!
Game Strategy Guides More strategy guides and game solutions are waiting for you on our homepage!
Discuss this article Visit the game forums and chat with our knowledgeable community members.
Shop for games Browse our store and find some great savings on pretty cool merchandise.
Read our Blog for site updates and commentary on a variety of interesting subjects.
Contact us to make a suggestion, ask a question or comment on this article.
Make a Donation to the ChessandPoker.com website at your convenience.
Copyright © 2003 James Yates All Rights Reserved. Article written by James Yates, founder and owner of the ChessandPoker.com website. Please review our Terms of Use page for information concerning the use of this website.
![]()
Rubik's Cube Solution
Solve the Rubik's cube in seven steps with our beginner-level guide.
![]()
Carcassonne Strategy
Rules and strategy for the most addictive game you've never heard of.
![]()
Sudoku Strategy
Covers beginner and advanced techniques for solving Sudoku puzzles.
![]()
Tic Tac Toe Solution
Reveals how to win or draw at the classic Pencil and Paper game.
![]()
Einstein's Problem
Solve Einstein's famous puzzle by dissecting his clever list of clues.
![]()
Peg Solitaire Strategy
Graphical notation shows how to optimally solve this perplexing puzzle.
![]()
Fifteen Puzzle Solution
Unravel the scrambled numbers of the famous fifteen puzzle.
![]()
Tower of Hanoi Solution
How to solve Tower of Hanoi puzzles with any number of starting disks.
![]()
Rock Paper Scissors
Prepare yourself for the hand-to-hand combat encounter Roshambo.
![]()
Dice Probabilities
Understand the probabilities at work when you throw the dice.
![]()
Solitaire Strategy
Learn how to efficiently clear your columns when solving Klondike Solitaire.
![]()
Vegas Solitaire
The dastardly Klondike variant which introduces three cards at a time.
![]()
Blackjack Basic Strategy
Details an effective strategy for all plays in the popular card game.
![]()
Video Poker Strategy
Covers optimal strategy for the video poker variant Jacks or Better.
![]()
Chess Strategy
Advanced tactics and strategy for the most popular board game ever.
![]()
Limit Hold em Strategy
Beginner-level guide designed to focus your play in Limit Hold'em.