How to Solve the Famous 15 Puzzle
 The World-famous Fifteen Puzzle has stumped curious gamers since the 18th century. Invented by Noyes Chapman, the Fifteen Puzzle is comprised of 15 numbered puzzle pieces contained in a small 4x4 box that allows each of the numbers to slide around freely based on the fact that there is always an empty space somewhere on the puzzle board.
The goal of the Fifteen puzzle is to arrange the pieces so that the top row reads 1-2-3-4 (from left to right), the second row 5-6-7-8, the third row 9-10-11-12 and the bottom row 13-14-15 with the space in the lower right-hand corner. While the premise seems quite simple, actually solving the fifteen puzzle turns out to be quite confusing for most. However, the ChessandPoker.com Fifteen puzzle strategy guide will reveal that there are several steps you can take that will allow you to not only solve the classic Fifteen puzzle, but also similar puzzles that have pictures instead of numbers on the faces of their puzzle pieces.
Step One : The 1-2 Combination
 The ChessandPoker.com 15 Puzzle solution involves solving two numbers at a time in order to work through the puzzle, while also following a somewhat more strict (and advanced) self-imposed rule: Once a number is correctly solved, we will continue the solution from that point on without ever moving it again.
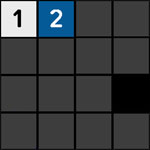
Step One focuses on solving our first two numbers, the 1-2 combination. For this step, none of the other numbers matter so only the 1-2 combination is shown in color (the rest are dark gray for now, and the space is shown in black). To begin, first maneuver the "1" puzzle piece into the upper left-hand corner of the board. This is accomplished by sliding the other numbered pieces out of the way while also moving the "1" closer and closer to its target location any chance you get. You can swap the pieces around any way you like, as long as the "1" ends up residing in the proper place. Once you've accomplished this, it's time to move the "2" puzzle piece directly to the right of the already solved "1" piece. Again, you may slide the pieces around however you want in order to move the "2" into position, but this time you must of course do so without moving the "1" piece out of position. When you're finished, your board should have the 1-2 solved with the other numbers randomly arranged around the puzzle board as shown in our graphic.
Step Two : The 3-4 Combination
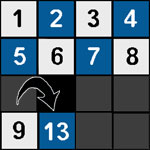
 The second group is the 3-4 combination, but they are slightly harder to solve since the already solved 1-2 cannot be disturbed from their positions from this point on. The first matter is to solve the "3" puzzle piece, and it's target location is directly to the right of the "2" piece. However, if you just move it up next to the "2" and the "4" isn't already directly beside it, the "4" will be blocked from moving up and you'll end up having to move the "3" out of position again. To avoid this, maneuver the "3" into the upper right hand corner of the board instead, making sure to leave a random piece in the three's actual target spot (beside the "2" piece). The random piece in between the "3" in the corner and the "2" must not be the "4" or the empty space. The reasons for this will soon become apparent. After the "3" is in it's preparatory position in the upper right hand corner, now move the "4" piece directly below it. The position you're aiming for is shown in our graphic to the right. Notice that the 3-4 combination is now connected and ready to move into their solved positions, and that the empty space is to the left of the pair. This method of connection will be used again in later steps. With both numbers in place, you may now slide the random piece that was next to the "2" down into the empty space, followed by sliding the "3" to the left and the "4" up. Completing this step solves the entire top row of numbers!
Step Three : The 5-6 Combination
 With the top row now solved, the space you have to maneuver the remaining puzzle pieces around is now becoming more cramped. This is of course because we do not want to disturb any of the already solved pieces at any point from here on out. The next two-number group we'll be solving is the 5-6 combination. This combination is solved in an identical manner to the 1-2 combination, with the only difference being that we of course cannot move any piece in the top row. So moving the pieces in the second, third and fourth rows from the top only, move the "5" piece into position directly below the "1" piece. Then move the "6" piece directly to it's right. Once again, you may move the pieces around however you like to get them into position as long as you don't touch the top row. When you're finished, your board will have the 1-2-3-4 top row finished and the 5-6 portion of the second row will now be in place as shown in our graphic.
Step Four : The 7-8 Combination
 The next combination on our menu is the 7-8 duo. If mobility was restricted before, it is now getting very tight considering we can only move the bottom two rows and just two pieces in the second row! Working forward, though, we can see once again that simply moving the "7" piece up beside the "6" will cause us problems since we'll have to move it out of position in order to get the "8" piece beside it. Using the same method as with the 3-4 combination, however, we can first move the "7" piece into the new upper right hand corner directly below the "4" (since the top row is of course now locked into place) with a random piece in between it and the "6" piece. Then, slide the "8" piece directly below it. The result will look like our example graphic to the right.
Of course, as with the previous 3-4 step, the random piece in between the "7" and the "6" must not be the "8" or the empty space. If the empty space starts out in between the seven and six, the "7" will have to move out of place in order for the "8" to be shuffled around, and if the "8" is there the two puzzle pieces are reversed from their intended locations and one of them will have to be moved back down into the bottom two rows in order to make any progress. With the 7-8 combination in the correct position, with the "7" above the "8" and the empty space to the left, slide the random placeholder piece down out of the way and move the "7" to the left and the "8" up into it's solved position. The top two rows are now completely solved.
Step Five : The 9-13 Combination
 Since we are now working only in the lower half of the board, space is once again very restricted. For this reason, solving the bottom two rows must be done in a somewhat different manner. Instead of moving on to the expected 9-10 combination, we are actually going to solve for the 9-13 combo instead. This is because the methods previously used to solve the 1-2 and 5-6 combinations will not work here, as we will no longer have enough rows left underneath to maneuver the necessary puzzle pieces in the usual manner. If the 9-10 combination was placed into its solved position, it would then be impossible to move either of the two puzzle pieces directly below them without moving the 9-10 out of position and leaving us stuck. However, solving the 9-13 combination will allow us to work sideways in effect. While we had previously connected our pairs first vertically and then horizontally, we're now solving in the opposite direction, horizontally then vertically.
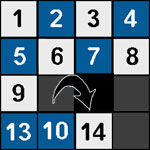
The first order of business is to place the "9" puzzle piece into position. The preliminary target location for the "9" in this step will be the lower left-hand corner, with a random piece above it which is not the "13" or the empty space. This should sound very familiar, since it is similar to how we prepared both the "3" and "7" tiles in previous steps. Then you'll move the "13" to its immediate right, followed up by sliding the random piece out of the way to the right and then the "9" and "13" up into their solved positions as shown in our graphic. When you're finished you'll have the "9" directly below the "5" and the "13" below the "9".
Step Six : The 10-14 Combination
 The next two numbers in our new sideways solving pattern would be the 10-14 combination. We'll arrange them into position via the previously described methods above. First the "10" piece is placed on the bottom row to the right of the "13" with a random piece above it that isn't the "14" or the empty space. Then the "14" is arranged to the direct right of the "10" and the random placeholder is shuffled out of the way to make room for the 10-14 combo to slide up into their solved positions. Occasionally it is difficult to get the positioning of the "10" correct, especially considering the fact that there are now only five total tiles that can be moved without disturbing the other solved tiles. A useful reminder is that if the "14" is anywhere to the left of the "10" piece things will not align properly. Move the "10" anywhere on the bottom row and then work the "14" to the rightmost column, while at the same time moving the "10" to the left and into position and proceed from there.
Step Seven : The Remaining Tiles
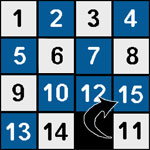 Once the 10-14 combination is in place there are only three unsolved squares as shown in the graphic. The final step is to simply rearrange the 11-12-15 tiles into their solved positions. This is accomplished by moving the "11" and "12" tiles into formation in the third row completing the 9-10-11-12 sequence and then connecting the 15 to the end of the fourth row. Congratulations, you've solved the Fifteen Puzzle!
As a bit of side trivia, there were once Fifteen puzzles that had the 14 and 15 pieces switched around to start the puzzle off. While a seemingly minor adjustment, this change actually rendered the Fifteen puzzle unsolvable! Luckily there aren't many of those floating around today, but if you do run into a Fifteen Puzzle that you can't solve this may in fact be the culprit. The techniques you've learned can also be used to solve various alternate versions of the Fifteen puzzle, and also to solve the standard puzzle for various more creative patterns.
ChessandPoker.com Browsing Options
Thank you for reading this featured game article! Please select one of the links below to continue navigating the Chess and Poker Dot Com website. Let us know if we can be of any further help. Good luck and happy gaming!
Game Strategy Guides More strategy guides and game solutions are waiting for you on our homepage!
Discuss this article Visit the game forums and chat with our knowledgeable community members.
Shop for games Browse our store and find some great savings on pretty cool merchandise.
Read our Blog for site updates and commentary on a variety of interesting subjects.
Contact us to make a suggestion, ask a question or comment on this article.
Make a Donation to the ChessandPoker.com website at your convenience.
Copyright © 2003 James Yates All Rights Reserved. Article written by James Yates, founder and owner of the ChessandPoker.com website. Please review our Terms of Use page for information concerning the use of this website.
![]()
Rubik's Cube Solution
Solve the Rubik's cube in seven steps with our beginner-level guide.
![]()
Carcassonne Strategy
Rules and strategy for the most addictive game you've never heard of.
![]()
Sudoku Strategy
Covers beginner and advanced techniques for solving Sudoku puzzles.
![]()
Tic Tac Toe Solution
Reveals how to win or draw at the classic Pencil and Paper game.
![]()
Einstein's Problem
Solve Einstein's famous puzzle by dissecting his clever list of clues.
![]()
Peg Solitaire Strategy
Graphical notation shows how to optimally solve this perplexing puzzle.
![]()
Tower of Hanoi Solution
How to solve Tower of Hanoi puzzles with any number of starting disks.
![]()
Rock Paper Scissors
Prepare yourself for the hand-to-hand combat encounter Roshambo.
![]()
Dice Probabilities
Understand the probabilities at work when you throw the dice.
![]()
Domino Strategy
Groundbreaking work explores the strategy of All-Fives dominoes.
![]()
Solitaire Strategy
Learn how to efficiently clear your columns when solving Klondike Solitaire.
![]()
Vegas Solitaire
The dastardly Klondike variant which introduces three cards at a time.
![]()
Blackjack Basic Strategy
Details an effective strategy for all plays in the popular card game.
![]()
Video Poker Strategy
Covers optimal strategy for the video poker variant Jacks or Better.
![]()
Chess Strategy
Advanced tactics and strategy for the most popular board game ever.
![]()
Limit Hold em Strategy
Beginner-level guide designed to focus your play in Limit Hold'em.