How to Solve the Rubik's Cube in Seven Steps
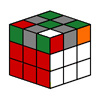
![]() The world's most famous puzzle, simultaneously beloved and despised for it's beautiful simple complexity, the Rubiks Cube has been frustrating gamers since Erno Rubik invented it back in 1974. Over the years many brave gamers have whole-heartedly taken up the challenge to restore a mixed Rubik's cube to it's colorful and perfect original configuration, only to find the solution lingering just out of their grasp time and time again. After spending hours and days twisting and turning the vaunted cube in vain, many resorted to removing and replacing the multi-colored facelets of the cube in a dastardly attempt to cheat the seemingly infallible logic of the cube, while others simply tossed it to the side and dubbed it impossible. The Rubik's cube, it seemed, had defeated all.
The world's most famous puzzle, simultaneously beloved and despised for it's beautiful simple complexity, the Rubiks Cube has been frustrating gamers since Erno Rubik invented it back in 1974. Over the years many brave gamers have whole-heartedly taken up the challenge to restore a mixed Rubik's cube to it's colorful and perfect original configuration, only to find the solution lingering just out of their grasp time and time again. After spending hours and days twisting and turning the vaunted cube in vain, many resorted to removing and replacing the multi-colored facelets of the cube in a dastardly attempt to cheat the seemingly infallible logic of the cube, while others simply tossed it to the side and dubbed it impossible. The Rubik's cube, it seemed, had defeated all.
Humanity required a solution, so intelligent gamers went to work to take down the so-called "frustration cube". Amazingly, not only did they discover a solution, they formulated many of them, ranging from beginner-level to advanced. One of these bright bulbs was Denny Dedmore. Not only did he discover an efficient and fool-proof solution for solving the cube, he also provided several amazing "algorithms" (move-sequences) which made following his talented solution very simple. Mr. Dedmore completed his now easy-to-master solution by inventing the brilliant move notation found throughout the guide, which made explaining the various twists and turns necessary to solve the Rubiks cube visually understandable.
| Follow @chessandpoker | Now spreading bad grammar and randomness via Twitter. |
We are proud to bring you the stunning Rubiks cube strategy guide originally developed by Denny Dedmore, now optimized and refreshed by Chess and Poker Dot Com, that will allow all of us to claim vindication and defeat the previously unbeatable Rubik's cube. Take your time, work through all of the steps until you understand them and you'll be able to successfully solve the rubik's cube. Finally!
Rubiks Cube Terminology and Move Notation
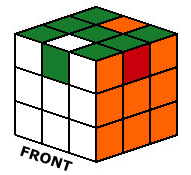
 The terms used in the Rubiks cube strategy guide are well-known to the cubing world. The squares that make up the Rubiks cube are known as Cubies. The colored stickers on the fronts of all the Cubies are known as Facelets. There are three types of Cubies: Corners, Edges and Center Cubies. Corners have three facelets, edges have two and the center Cubies have only one facelet. Notice that in our graphic there is also a label under one side of the cube that says "Front". Since all of the diagrams are shown at an angle, also showing the right and top sides of the cube, it's important to always look at the cube from the front perspective when making your moves. Showing the cube at an angle is necessary because you will have to make different sets of moves based on various arrangements of Cubies on both of these other two sides.


This group of notation graphics indicate which direction the various horizontal rows of the Rubiks cube should be turned. There are 3 different rows.


This group of notation graphics indicate which direction the various vertical columns of the Rubiks cube should be turned. There are 3 different columns.


These notation graphics indicate which direction the entire front face of the cube should be turned.
Now that you know the terminology used throughout the strategy guide, let's learn how to understand the move notation graphics. Utilizing the Rubik's cube move notation chart, you can find the definitions of each tiny graphic. The first two sets show which horizontal row or vertical column should be moved, and in which direction. When looking at the front of the cube, the top three horizontal Cubies make up the top row. The middle horizontal row of cubies (from the top or bottom) make up the middle row, and finally the bottom three horizontal cubies make up the bottom row. So what about the columns? Still looking at the front of the cube, the three vertical cubies on the left make up the left column. Then the next three vertical cubies make up the middle column and the last three vertical cubies make up the right column. But what about the looping arrow notation graphics?
When you are looking directly at the front of the cube, which you should always be doing, the nine Cubies with various facelets that you see are known as the front face of the cube. When you see the "turning arrow" notation graphics from the third set, they are instructing you to turn all nine of these cubies at the same time to either the right (clockwise) or left (counter-clockwise). So instead of moving individual rows or columns, when you see these graphics you should turn the entire front face of the cube to the direction indicated. Using these and the other notation graphics explained above you are now ready to begin solving the cube. But before you begin, we suggest that you first play around with the cube for a while and try to understand these moves and how they move the various parts of the cube around. Some of the moves can be a bit tricky for your fingers. For example, when you are moving a middle row or column, you in fact must move two columns or rows, and then turn the non-middle one back to it's previous spot. This is because the middle rows or columns do not move independently. Don't forget to move the other row or column back! Once you are comfortable with all of the moves, it's time to solve.
The Seven-Step Guide to Solving a Rubiks cube
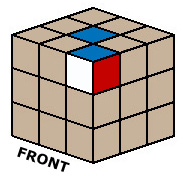
To begin the solution, we must first prime the cube. To do so, simply pick a corner cubie and turn it so that it is the upper-right-hand corner cubie on the front of your cube. It can be any color, but for our example we will be using the Blue-Red-White corner as shown, with the white facelet on the front, the red facelet on the right and the blue facelet on the top. Then, you must turn the rest of the cube around until the top color of your selected first corner cubie also matches the center. Our top color is blue so we must turn the blue center cubie around to the top of the cube. You can move the Blue center around in any direction you want until it arrives at the correct top-center position as shown. By priming the cube in this way, you have already solved two of the top row cubies. We are now ready to solve the rest of the cube.
We used (and pretty much destroyed) our Collector's Edition Rubik's Cube when developing our Rubik's cube guide.
Step One: Place the Top Row Corners
 Since we have solved the first corner of our top row when we primed it, we are now ready to solve the other three. To do so, you must turn the entire cube (not any rows, columns or faces) to the left so that your original corner cubie is now the upper-left-hand corner on the front of the cube. In our example, you can see that the upper-left-hand corner is now the original blue-red-white corner with the blue and red facelets showing on the graphic (since we turned the entire cube to the left). We now need to solve the upper-right-hand corner again, so we must figure out which corner to put there. In fact, this is quite easy. Since the mystery cubie must have blue on it (otherwise it won't match the rest of the top color), and it must also have red on it (or it won't make a full-red side with the first red facelet there), we simply must find the other corner on the cube with blue and red on it. On our cube, this would be the Blue-Red-Yellow cubie.
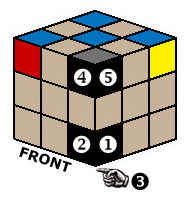
The next step is to maneuver this target cubie to the bottom-right-hand corner of the cube (shown here in black to help demonstrate the target location). The blue, red and yellow facelets on this cubie can be in any order and on any side as long as the cubie is in its proper spot. Simply turn the bottom row around (without disturbing the top row) until your target cubie is in its place. Once the cubie is at the bottom-right-hand corner on the front, depending on the location of the top color (Blue) we will choose one of the following algorithms to move it up to the top-right-hand corner and flip it around to line it up properly.


For example, if our Blue-Red-Yellow cubie happens to have the blue facelet showing on the right side of the cube (position 1) we would use the first algorithm. If instead it was on the front side (position 2) we would use the second algorithm. Finally, if the Blue facelet is on the bottom of the cubie (position 3, indicated by the hand pointing to the bottom) you would use the third algorithm.
 It may also happen that the target Blue-Red-Yellow Cubie is already in its proper top-row position but it is not facing the right way (the red facelet is not on the same side as the original red facelet). If the Blue facelet is on the front (position 4) use the fourth algorithm, and of course if it is on the right side of the cubie (position 5) use the fifth algorithm. If your desired cubie is trapped in the middle layer, simply skip to another corner and once you solve it the target cubie will have been forced back into the top or bottom row. When you are finished with the corners, your cube will have a Blue "X" on the top with all of the corner colors matching up horizontally with their partners.
Step Two: Place the Edges and Finish the Top Layer
 Now that we know the general ideas on how to find the proper target cubie and then move it into position, we're ready to finish the top layer. Keeping the above concepts in mind, we must now find the target edge cubies (those that will complete the top row) and move them into the new target positions, again colored black here. Simply turn the bottom and middle layers until the target cubie is in one of these spots, and based on which side the top color (blue) is on, select from the following algorithms to move it into its place. When you are finished with step two, the entire top layer of the cube is solved.
Step Three: Align the Centers and Place the Middle Layer Edges
 To begin step 3, you must first turn the middle layer around so that the center cubies in the middle layer all match with their top layer counterparts. In our example, you can see that the red center and yellow center match up with their respective colors above them. This is known as forming the Half-T. Once you have the centers aligned, you've already partially solved the middle layer. The only thing left to do is place the remaining edges.
Now, turning only the bottom row, we will position the target cubie so that it will match up with its same-color center forming the Full-T. In our example, we have turned the bottom row around so that we have formed a Full Red T on the front of the cube. We may be ready to place this cube into position, but we must first check to make sure it is indeed the correct edge. On our cube, we would need the bottom of the Red T cubie to be either Yellow (which when moved to the right would match up with the Red and Yellow centers) or the Red-White cubie (which on our cube could be moved left, matching up with the Red and White centers). If this edge cannot connect either of the two centers to the left or right, or it is upside down (there is not a T formed, the Red facelet is improperly on the bottom) you must move on to another T formation. There will almost always be another T immediately possible. Here are the algorithms you'll use to move the target cubie to the left or right as needed:
Left
Right
If you find that no T is possible, or that the correct edge is in the proper position but is turned around so that the colors do not match up, simply place a random cubie into its place by performing either of the algorithms once, which will force the proper cubie back to the bottom. Occasionally, you will have to do this several times to get the positioning correct. When you have finished, your cube will have both the top and middle layers fully solved.
Step Four: Turn the Cube Over and Arrange the Last Layer Corners
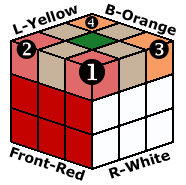 Now you'll turn the entire cube upside down (the Blue top now becomes the bottom) and arrange the last unfinished layer (Green) corners into their correct positions, although not yet finished. On our cube, the front face is the red side. So the correct corners for the front (labeled as 1 and 2) must both have Green and Red facelets on them so they'll match up with the bottom two layers we've already solved and also the Green top. Using this logic, the back side of our cube is Orange so the back corners (labeled as 3 and 4) must both then contain Green and Orange facelets. Furthermore, all the final corners must also be on their correct sides. For example, on our cube the Green-Red-White corner must be in position 1 and the Green-Red-Yellow corner must be in position 2. Once we are ready to finish them in the next step they must be ready to match up with all three colors.
 Remember, we aren't trying to completely solve these final corners yet, just moving them into place to be finished in the next step. As an example, on the mini-cube to the right you can see that the Green-Red-White corner is in the correct position but not yet finished (the green facelet is on the front, the white facelet is on the top etc). The Green-Orange-White cubie on the back right side is also in the correct position, but obviously not matching up correctly yet (the orange facelet is on the white side). However, that's all you have to do for this step! We'll be flipping all of these corners around to finish them in Step Five. Here are the maneuvers used to arrange the corners into their correct positions, although not yet solved:
Switch 1 and 2
Switch 1 and 3
Many times you can take a look around the unfinished top layer and find the two Red corners already side-by-side. If that's the case, just turn the top layer around so that both Red corners are on the Red front (without disturbing the two finished layers below of course). Then you'll just have to use the "Switch One and Two" maneuver to move them back and forth to the proper sides. Concerning the Orange corners, you must turn the entire cube around (not moving any rows or columns) so that the Orange side is now the front. Then you can perform the switching maneuvers as needed. If two Reds are diagonal from one another (the red corners are currently at positions 2 and 3), perform the "Switch One and Three" maneuver to bring them side-by-side. When you have finished this step, your cube will have the corners arranged to their proper positions, but probably not yet finished.
Step Five: Completely Finish the Last Layer Corners
 In this step, we will flip all of the last layer corners around into their final finished positions. On our cube, Green is the last layer color. To solve the corners, we will focus on three different configurations concerning the Green facelets. Using the graphic to the left, hold your cube so that when you are looking at the front you can see any of these Green facelet configurations exactly as shown. For this step, none of the other remaining facelets (or the rest of the cube) matter so they are not shown, including any other Green facelets on the last layer. Once you've located one of the three arrangements, perform the following algorithm:
Several times
Remember that while two of the configurations (the middle and bottom) require the green facelets be located on the right side of the cube, it's still necessary to perform the algorithm above from the front. You'll have to perform this algorithm several times, and you'll need to use at least two of the three different configurations to continue (finding the same configuration over and over again will just get you stuck). If you couldn't find one of the starting configurations to begin this step, perform the algorithm once and then you'll be able to find one of them.
Step Six: Completely Finish Two Edges and Prepare the Remaining Two
 You should now find that you have also placed at least one of the remaining last layer edges into its final position, although not necessarily turned around correctly. Turn the entire cube around so that the side with a correctly positioned edge is now the front (in some cases, you'll have a couple to choose from). In our diagram, the side with the Green-White edge is the front because the edge is in its proper place (just needing to be flipped over). Then perform the following repositioning algorithm to move the rest of the edges into their proper places (up to two times). If you couldn't find a correctly positioned edge to start with, perform the algorithm once from any front and then proceed as usual.
From the Correctly-Positioned Edge Side
Step Seven: Solve the Rubik's Cube
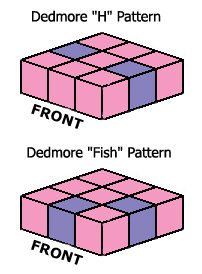 We are now ready to completely solve the Rubik's cube. At this point, only the last unfinished layer concerns us so the rest of the cube is not shown. In almost all cases, there will be two edges completely solved after finishing step six above, and two edges unsolved. The two unsolved edges, however, are now properly positioned on their correct sides and simply need to be turned around to be finished. Turn the entire cube around until the last two unsolved edges match up to either of the graphics shown to the left when looking at the front of the cube. In our graphic, the completely solved cubies of the last layer are shown in Pink, and the two unsolved edges are shown in Purple.
Once you are ready, perform the applicable last layer algorithm below to completely solve the cube. The first is known as the "H" Pattern, and the second is known as the "Fish Pattern". If for some reason you had all four edges flipped (instead of the usual two edges) when you finished step six, simply perform the "H" Pattern once from any front. You will then be able to find either of the two original patterns at that point. Congratulations! You've solved the Rubiks Cube!
Dedmore H
Dedmore Fish
ChessandPoker.com Browsing Options
Thank you for reading this featured game article! Please select one of the links below to continue navigating the Chess and Poker Dot Com website. Let us know if we can be of any further help. Good luck and happy gaming!
Game Strategy Guides More strategy guides and game solutions are waiting for you on our homepage!
Discuss this article Visit the game forums and chat with our knowledgeable community members.
Shop for games Browse our store and find some great savings on pretty cool merchandise.
Read our Blog for site updates and commentary on a variety of interesting subjects.
Contact us to make a suggestion, ask a question or comment on this article.
Make a Donation to the ChessandPoker.com website at your convenience.
Copyright © 2003 James Yates All Rights Reserved. Article written by James Yates, founder and owner of the ChessandPoker.com website. Please review our Terms of Use page for information concerning the use of this website.
![]()
Carcassonne Strategy
Rules and strategy for the most addictive game you've never heard of.
![]()
Sudoku Strategy
Covers beginner and advanced techniques for solving Sudoku puzzles.
![]()
Tic Tac Toe Solution
Reveals how to win or draw at the classic Pencil and Paper game.
![]()
Einstein's Problem
Solve Einstein's famous puzzle by dissecting his clever list of clues.
![]()
Peg Solitaire Strategy
Graphical notation shows how to optimally solve this perplexing puzzle.
![]()
Fifteen Puzzle Solution
Unravel the scrambled numbers of the famous fifteen puzzle.
![]()
Tower of Hanoi Solution
How to solve Tower of Hanoi puzzles with any number of starting disks.
![]()
Rock Paper Scissors
Prepare yourself for the hand-to-hand combat encounter Roshambo.
![]()
Dice Probabilities
Understand the probabilities at work when you throw the dice.
![]()
Domino Strategy
Groundbreaking work explores the strategy of All-Fives dominoes.
![]()
Solitaire Strategy
Learn how to efficiently clear your columns when solving Klondike Solitaire.
![]()
Vegas Solitaire
The dastardly Klondike variant which introduces three cards at a time.
![]()
Blackjack Basic Strategy
Details an effective strategy for all plays in the popular card game.
![]()
Video Poker Strategy
Covers optimal strategy for the video poker variant Jacks or Better.
![]()
Chess Strategy
Advanced tactics and strategy for the most popular board game ever.
![]()
Limit Hold em Strategy
Beginner-level guide designed to focus your play in Limit Hold'em.