How to Solve Peg Solitaire (Hi-Q) with Step-by-Step Advice
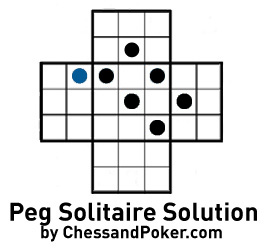 Peg Solitaire is one of the most recognizable and popular board games of all time. With easy-to-learn rules and seemingly simple goals, many are taken by surprise when they discover how deceivingly difficult the puzzle turns out to be. The object of the game is to not only remove all of the pegs from the board by jumping over them with any of the other pegs, but also to accomplish this daunting task while simultaneously ending your jumping spree with a peg resting exactly in the center hole of the board. If you've ever tried your hand at solving a Peg Solitaire board, you'll surely understand how frustratingly elusive these simple tasks turn out to be. However, many players worked very hard over the more than 300 years that the game has been played to discover a solution to the challenging puzzle, manually hashing out the moves by hand until they could successfully map out the proper configurations. In fact, a man named Ernest Bergholt actually provided a solution to Peg Solitaire back in 1912 that required only 18 moves to sweep the board of pegs except for a lone fellow landing beautifully in the center hole on the final move of the game. The Chess and Poker Dot Com Peg Solitaire guide follows this solution with a clear, graphical explanation below. To begin, let's take a quick refresher course on how a game of Peg Solitaire is played.
How to Play Peg Solitaire
A player selects a peg and then moves it across the board by legally jumping any other peg that it chooses. Whenever a peg is jumped, it is removed from the board and is out of play. Pegs can only jump over pegs that are horizontally or vertically adjacent to the jumping peg, and can only jump over one peg at a time. Diagonal jumps are not allowed, and there must always be an empty target hole on the other side of the peg being jumped in order for the move to be legal (they can't jump over one peg and land on another). However, a player can make multiple jumps with the same starting peg (without putting it down and selecting another) during the same turn as long as they are still following the standard rules above. Actually, these multiple jumps with the same peg actually only count as one total move, even though it jumped and removed multiple pegs from the board in the same sequence.
In the Peg solitaire solution below, we'll be using arrows to illustrate which peg should be used and in which direction it should be jumping other pegs for each move. The arrows will lead out from the peg that will be doing the jumping, known as the Target Peg (colored blue in our graphics), and will end at the indicated square following the initial jump. In some cases, there will be multiple arrows in the same move indicating that multiple legal jumps are to be performed to execute the move correctly. After a few practice games with your own Peg solitaire board, you should have the hang of it in no time at all. To aide in the memorization of this optimal Peg solitaire solution, we've listed each of the 18 maneuvers in two-move groupings (left to right in each category) along with headlines that note the move counts and a helpful title for each set of moves. Now it's time to get started!
Throughout the guide, I'll discuss the direction of jumps based on whether or not they're moving toward the Left or Right sides of the board, and also if they are migrating Up (towards the top of the board) or Down (towards the bottom of the board). Occasionally, there will be multiple jumps during the same move. As previously stated these will be indicated with multiple arrows on the same graphic. Simply jump the original peg over each successive peg as shown in the graphic until you've reached the destination peg-hole. Even though there were multiple jumps, as long as they were consecutive jumps (all in a row, jumped with the same peg) they still only count as one total move.
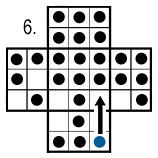
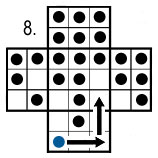
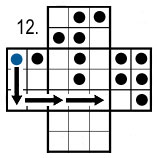
Moves 1 and 2 : The First T
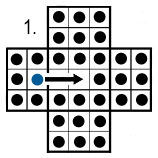 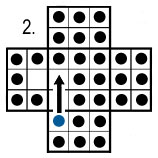 |
To unravel the seemingly complex peg solitaire board, we'll work in two move groupings until we completely solve the game (in the least amount of moves to boot). Move #1 is very simple and involves only one jump. We see that the peg we'll pick up and use to jump (with the arrow coming out of it) should hop over the peg directly to its right and take up a new home in the previously vacant center square to kick off the game. The peg that was jumped is removed from the board, leaving an empty peg-hole where it once was. It's useful to note that whenever a single peg is jumped, it's known as a Single Jump. This first move would of course qualify as a single jump, since it only clears one peg. Move #2 of the solution, shown in the next graphic to the right, is also a single jump having the newly selected jumping peg hop upwards into the vacated peg-hole created after the first move. To aid in memorizing these first two moves we've selected the title "The First T". This is because, much like identifying constellations, when viewed as a whole the two consecutive movements vaguely appear to draw a T with their movements. And since it's labeled as the first T, perhaps we'll perform another maneuver similar to this in the not so distant future.
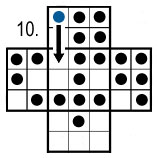
Moves 3 and 4 : The First Back and Forth
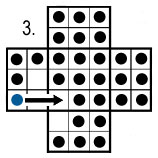  |
Now we've cleared a total of two pegs from the board, and are ready to move on to the next two moves. Move #3 is yet another single jump, with the target peg leaping to the right and claiming another unwitting victim. Move #4 is a single jump as well, this time to the left, where we actually have the target peg jumping over the peg that we just used on the previous turn. Perhaps the little guy had landed with a smug look on his face or something similar, but whatever the case he is re-jumped in the very next move. Having successfully cleared two more pegs, we've now moved a total of 4 pegs into the captured column to date. We've labeled these two moves as "The First Back and Forth", since when viewed as a whole they seem to be spitefully jumping each other back and forth. Our investigative powers might further deduce that another back and forth maneuver may be looming on the horizon.
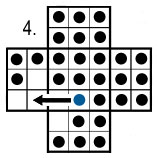
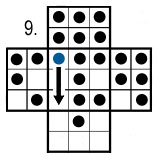
Moves 5 and 6 : The Second T (Reverse)
  |
As suspected, the fifth and sixth moves of our solution once again attempt to form a T-like pattern with their captures, this time in a somewhat backwards effect as compared to the previous movements. Move #5 shows our target peg jumping to the left in a single-move capture, followed by Move #6 where the target peg jumps upward to pick off its prey, again with only one jump for the move. Up to this point in the solution, we've captured six pegs with a total of six moves. This is an excellent spot to pause and memorize the previous actions up to here since the moves have all been single jumps and you only need to remember where to start your jumps and in which direction you'll be capturing the pegs. In the upcoming moves, we'll actually start capturing multiple pegs in the same "move" so once you've mastered the first six moves it's onward to more satisfying conquests.
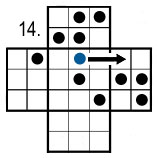
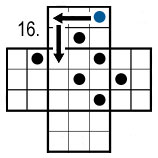
Moves 7 and 8: Set-up For A Double Jump
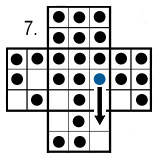  |
The first move in this group is actually a set-up move for the next, insidiously placing the first active peg into position for a double homicide following its action. In Move #7 we have the target peg performing a down-jump to capture its peg. However, in Move #8 we see that this ill-advised move has actually left this fellow in the line-of-fire for the first Double Jump of the game. Move #8 is a two-jump sequence with the same starting peg, so even though two jumps occur the sequence only counts as one move as previously discussed. The target peg first jumps to the right, and then in one fail swoop again jumps another peg with an upward jump immediately afterwards. In a one-two punch, two pegs are KO'd at once. The poor peg that did the jumping in the seventh move must not be that pleased with unknowingly setting himself up to be part of the surprising double jump in Move #8. With renewed blood-lust, we'll now move on to an even more tasty set-up where two more victims cheerfully put themselves in harms way.
Moves 9 and 10 : The Waterfall Setup
  |
We've named these two moves "The Waterfall Setup". This is because when viewed as a whole the two moves cascade down the board together in a very pleasing and easy-to-remember sequence. Move #9 has the target peg performing a down-jump, and once the jumped peg is removed from the board Move #10 follows up in a similar manner, jumping downwards as well just above the previous move and chopping off another peg in these two separate Single Jumps. Taking a look at the board now, you might be able to get a feel for the possibility of a much larger jumping sequence than we've become accustomed to, even larger than the previous Double Jump maneuver. Since it's not called the Waterfall Setup by accident, we can assume that these two pegs are in for some rougher waters on the very next move. In fact, it's time for a couple of sweep-and-clears that will wipe the board of a large number of pegs and move us that much closer to a fully-solved board.
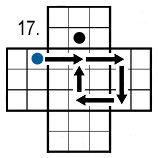
Moves 11 and 12 : The Backwards U and The Lazy L
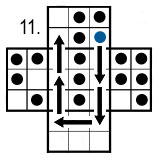  |
Move #11 starts off the carnage with a devastating quintuple jump, capturing five pegs with five jumps in the same move. Following the arrows originating from our target peg, we see that it begins by down-jumping two pegs in a row before jumping to the left (taking the third peg) and then back up with two up-jumps to complete the five-capture sequence. Just like that, in one sequence we've captured almost half as many pegs than we had in the previous ten moves. And we're not finished. Move #12 keeps the killing spree alive by activating the target peg with a triple jump, first a single down-jump into a double-jump to the right. We've labeled the eleventh move "The Backwards U" since the jumps have the effect of drawing the letter U backwards across the board, and we're calling the twelfth move "The Lazy L" since it somewhat resembles an L that has laid down for a quick nap. We're aware that it would have to be a backwards L for this description to be appropriate but we'd like to see you come up with names for peg-jumping sequences. Pay no attention to the man behind the curtain!
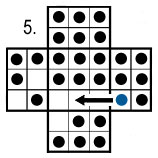
Moves 13 and 14 : The Second Back and Forth (Reverse)
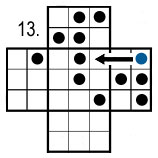  |
Settling down for a brief moment, we now come upon a set of rather boring single jumps that provide a calming down period following our previous gluttonous feeding frenzy. Move #13 shows a single-jump to the left by our target peg, followed up by Move #14 where another single-jump (this time in the opposite direction) occurs. Hey, this must be "The Second Back and Forth" maneuver we discussed quite a few moves ago. It's good to see the prediction actually came true. And since we've come to an easy-to-remember breaking point in the action, this a great place to stop and memorize to. And yes, you have to memorize the solution since solving the board is not nearly as impressive of a feat when you have to use your laptop to demonstrate your mind mastery. After all, you can find anything on the interweb, especially at interesting sites such as ChessandPoker.com created, owned and operated by James Yates :)
Moves 15 and 16 : The Two Double Jump Setups
  |
We are now approaching the completion of our solution, and it's time once again to require two pegs to walk the plank in preparation for a multi-jump mutiny. We'll be doing so with double jumps this time, with Move #15 and #16 both performing their indicated maneuvers as shown here. After completing the two double-jump sequences, the board takes on a very pleasing aesthetic. All of the remaining pegs are evenly spaced about the board, and we can visualize what will likely occur next. It is both impressive and quite amazing that Mr. Bergholt arrived at this beautiful, brilliant solution so many years ago by hand. Such efficiency is very admirable even by todays computer-driven standards. Now, it's time to solve Peg Solitaire and put this once mysterious, but still enduring, puzzle to rest.
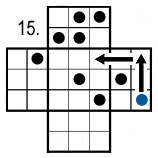
Moves 17 and 18 : There's No Place Like Home
 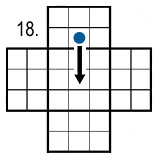 |
In the penultimate preparation move, we'll once again perform a well-calculated quintuple jump. In Move #17 our target peg starts its journey across the board by jumping twice to the right, followed up by one down-jump, a single left-jump and finally the last up-jump of the game. The final move of the puzzle, Move #18 has us completing our journey by making the final jump downwards into the center square, exactly as we had planned when we began our solution 32 pegs ago. Take your time to work through the solution until you understand not only the mechanics of how it worked but also the underlying concepts of set-up and follow-through. These factors make it possible to solve games and puzzles of even more lofty difficulty. Good luck with your solutions and thanks for visiting us!
ChessandPoker.com Browsing Options
Thank you for reading this featured game article! Please select one of the links below to continue navigating the Chess and Poker Dot Com website. Let us know if we can be of any further help. Good luck and happy gaming!
Game Strategy Guides More strategy guides and game solutions are waiting for you on our homepage!
Discuss this article Visit the game forums and chat with our knowledgeable community members.
Shop for games Browse our store and find some great savings on pretty cool merchandise.
Read our Blog for site updates and commentary on a variety of interesting subjects.
Contact us to make a suggestion, ask a question or comment on this article.
Make a Donation to the ChessandPoker.com website at your convenience.
Copyright © 2003 James Yates All Rights Reserved. Article written by James Yates, founder and owner of the ChessandPoker.com website. Please review our Terms of Use page for information concerning the use of this website.
![]()
Rubik's Cube Solution
Solve the Rubik's cube in seven steps with our beginner-level guide.
![]()
Carcassonne Strategy
Rules and strategy for the most addictive game you've never heard of.
![]()
Sudoku Strategy
Covers beginner and advanced techniques for solving Sudoku puzzles.
![]()
Tic Tac Toe Solution
Reveals how to win or draw at the classic Pencil and Paper game.
![]()
Einstein's Problem
Solve Einstein's famous puzzle by dissecting his clever list of clues.
![]()
Fifteen Puzzle Solution
Unravel the scrambled numbers of the famous fifteen puzzle.
![]()
Tower of Hanoi Solution
How to solve Tower of Hanoi puzzles with any number of starting disks.
![]()
Rock Paper Scissors
Prepare yourself for the hand-to-hand combat encounter Roshambo.
![]()
Dice Probabilities
Understand the probabilities at work when you throw the dice.
![]()
Domino Strategy
Groundbreaking work explores the strategy of All-Fives dominoes.
![]()
Solitaire Strategy
Learn how to efficiently clear your columns when solving Klondike Solitaire.
![]()
Vegas Solitaire
The dastardly Klondike variant which introduces three cards at a time.
![]()
Blackjack Basic Strategy
Details an effective strategy for all plays in the popular card game.
![]()
Video Poker Strategy
Covers optimal strategy for the video poker variant Jacks or Better.
![]()
Chess Strategy
Advanced tactics and strategy for the most popular board game ever.
![]()
Limit Hold em Strategy
Beginner-level guide designed to focus your play in Limit Hold'em.